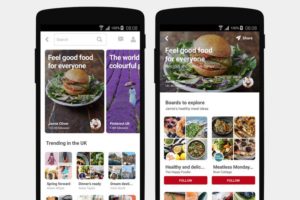
What exactly is Pinterest? For those of you unfamiliar with this amazing social network, Pinterest is “the world’s catalog of ideas.” Find and save Pins of recipes, DIY projects, parenting hacks, style inspirations and many other ideas.
Other social networks like the ever so popular Facebook are often what businesses tend to flock to, but many don’t realize how the visual aspects of a platform like Pinterest can also benefit them as a whole. Here’s everything you need to know, including tips and tools to help you get more from Pinterest.
How Does It Work?
The first step to use Pinterest is to sign up and create an account. It’s extremely important that businesses sign up specifically for a business account, which have similar features but are ultimately different than a regular account. But don’t worry… you can convert your personal account to a business account!
Business accounts have access to Pinterest Analytics, which helps you understand how people are engaging with content from your site and Pins from your profile. When you sign up as a business, you’ll also get updates on future products and services that Pinterest builds for businesses particularly. Not only is an account free, but you now have access to features that will help your business thrive on the platform.
To sign up for a business account, you’ll need to enter some personal information: your email address, a password, the name of your business and what type of business you run. After this is completed, you can start to set up your profile.
Another wonderful thing about this platform is that you can access your home feed from your laptop or mobile app. Since I’m always on my phone, I find the app to be the most convenient; I’m guilty of endless scrolling! On your home feed you will see the most recent Pins from the accounts that you follow. It’s the perfect setup for seamless browsing.

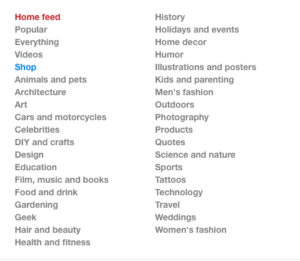
Across the top you’ll see a search bar. To the left, there’s the Pinterest logo (which takes you back to the home page when clicked), as well as menu options for Analytics and Ads. To the right there is a drop-down menu, which displays links to all of the categories you can browse through on the platform.
Go a little more to the right side and you’ll see a “+” button and a chat button.
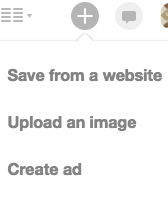
The “+” buttons allows you to add a new Pin or create a new ad. When clicked, the chat bubble button shows a drop-down menu with three options: News, You and Messages.
- News displays trending Pins and other site updates
- You shows your notifications from other users that interact with your Pins
- Messages are your messages with other Pinterest users
If you don’t know what Pins and Boards are, I’m here to help! In the simplest terms, Pins are the content, like articles or images, that you share on Pinterest. Boards are how you choose to organize that content. You can’t start Pinning until you create a board.
Creating Your Boards
To create your first Pinterest board, you have to go to your profile where you’ll see a red Create Board button. Once you click that, a box will pop up with the information you need to fill in about the board.
Here you can enter a name for your board, a description of what it’s about and the category it falls under. While these may be optional, I would suggest filling them out because they can help people discover your boards more often.
Another cool feature is keeping your board secret, if you’d like to be the only one to have access or share with only a few people rather than all of your followers. You can also add “Collaborators” where you can invite other Pinterest users who can contribute Pins to that specific board. These Pins will show up on both your profile and the other users’ profiles.
After you fill out all the information that you’d like, you’re all set. You can start Pinning!
Adding A Pin
To add your own content to Pinterest, such as a blog post (think a board titled Blogs), go to the board that you’d like to Pin to and click the “Add a Pin” button. You will then be asked if you’d like to ad a Pin from the Web or from a personal file on your computer. You could also use the “+” button on the top of the page.
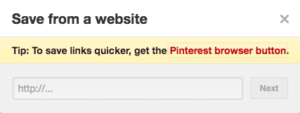
If adding a Pin from the Web, Pinterest will prompt you to enter a link to the page you’re pinning from. From there, you’ll be taken to a page that populates images from the site that you’re pulling from, where you can select the picture you want to show as your Pin by clicking the Pin It button.
You’re going to then see a box that allows you to create a description for your Pin and choose the board. When you’re done perfecting your new Pin, click the Create button. Pinning a link from the Web will ensure that when someone views your Pin, it links back to the website it originally came from.
Interacting With Other Pinterest Users
Unlike most social networks, Pinterest isn’t centered on interacting with users. What makes Pinterest so unique is that it’s much more about sharing and saving content… but it IS still a social network, so there’s a way for users to connect with other people. You can repin someone’s Pin along with many other methods of interacting.
- Likes: Liking a Pin is any easy way to connect with another Pinterest user. These likes also appear on your profile, so you’re able to view it later on if you don’t end up Pinning it right away. All you have to do is hover over the Pin that you like and click the heart button.
- Comments: Like any other social network, you can comment on another user’s Pin. To do so, click on the Pin you want to comment on and then you’ll see a comment box to share your ideas/remarks/observations.
- Tagging users: If there’s a Pin that you think your coworker or friend will love, tag them by using the @ symbol. Similar to Twitter, you just type the @ symbol and the username of the person you’d like to tag, and they’ll be notified of your comment.
- Messages: Other Pinterest users can send and see your private messages. To send a message, click the Messages option in the little chat bubble icon at the top of the page.
Engaging with users in the community helps build your brand!
Pinterest Analytics
You’ll find your account’s analytics page by clicking on Analytics at the top of the page. You will see a drop-down menu where you can either click Overview, Profile or Audience.
When you select Overview you’ll see statistics about profile, audience and more. Here you can see data from your profile’s average daily impressions and viewers, your average monthly viewers and average monthly engagements. Pinterest analytics allows you to learn valuable things about your audience.
Tips & Tools
- Pin like a pro
- Pin at least once a day so your followers get fresh content in their home feeds.
- Don’t just Pin your own stuff. You can tell a richer story by adding Pins from others. You could even partner with bloggers and lifestyle websites to Pin their content. Your followers will appreciate the Pins, and the bloggers will appreciate the referral traffic.
- Make sure your Pins link back to somewhere helpful, so that Pinners can have a better experience and so that you can get more referral traffic to the right places.
- Once you’ve make it easy to Pin from your website, you might also want to create new Pins just to share on Pinterest.
- Just like with boards, thoughtful descriptions will make your Pins more inspiring and searchable.
- Engage with other Pinners
- Create group boards and invite people who love your brand to contribute.
- Make it easy for people to Pin your stuff by adding the Follow button to your website. Include a Pinterest link in emails and your social media posts to make sure people know you’re here, too.
- Consider how your Pins will look in feeds, not just on boards, since most people will find them there.
- The Image
- Use high-quality images. Make sure they’re well-composed and in focus.
- Go for taller Pins. Vertically-oriented Pins look better on mobile screens.
- Pins with multiple images can work well for Pinners looking for how-to’s, but keep it to four images or fewer so it doesn’t look too crowded.
- Minimize the amount of text on an image. Make sure it’s easy to read on mobile screens.
- The Description
- Every Pin should have a description that gives context. The best descriptions are positive, helping people imagine what they might do with the Pin while also providing extra information.
- Write thoughtful, timeless copy. Pins last forever, so avoid descriptions that focus on timely promotional information.
- More You Can Do
- Use Rich Pins wherever possible so your brand and other useful details stay on the Pin as it gets repinned.
- Link out your Pins to places that help people. For example, a movie Pin should lead to a trailer or a review, and a product Pin should lead to where a Pinner can make the purchase.
- Get Specific
- Think about what people who are looking at a certain Pin might have searched for. Was it a sweater, or was it an argyle sweater? A blue sweater or a cashmere sweater? Mention the most compelling and distinct parts of the Pin in your description, and your Pins are more likely to surface when people get specific in searches.
I wish you luck growing your business with Pinterest! Need some help managing your Pinterest and/or other social media accounts? Infinite Reach takes social media off your plate so you can focus on what your business.
We’d love to hear from you! Contact us today.


